环境配置
- Windows32/64
- Node.js | 32位 | 64位
- Git | 32位 | 64位 (安装时一路NEXT)
- Sublime Text | 32位 | 64位 (下述文件均用这个软件打开)
- 配置环境变量 教程
- 完成检查: 如果与下述相同就OK了
1 | //Windows+R cmd |
账号准备
- Github账号,下述账号名称之为
NAME,邮箱名称之为EMAI. - 新建项目(Github首页->
Start a project)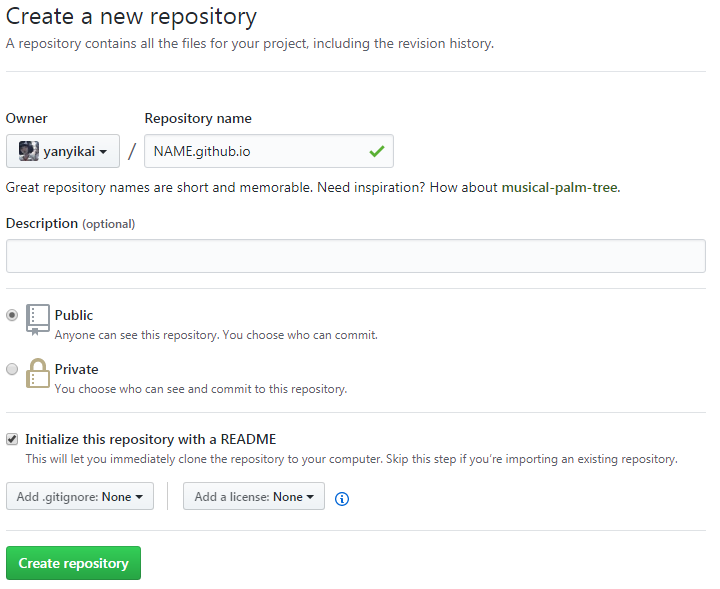
初始化
根目录创建
在一个合适的位置创建一个文件夹(别称:根目录),下文中由E:\Blog来演示.1
2
3C:\Users\student>E:
E:\>cd Blog
E:\Blog>
安装hexo.
1 | E:\Blog>npm install hexo -g --save |
检查:1
2
3
4
5
6
7
8
9
10
11
12
13
14
15
16
17
18E:\Blog>hexo -v
hexo: 3.6.0
hexo-cli: 1.1.0
os: Windows_NT 6.1.7601 win32 ia32
http_parser: 2.7.0
node: 9.9.0
v8: 6.2.414.46-node.22
uv: 1.19.2
zlib: 1.2.11
ares: 1.13.0
modules: 59
nghttp2: 1.29.0
napi: 2
openssl: 1.0.2n
icu: 60.2
unicode: 10.0
cldr: 32.0.1
tz: 2017c
初始化hexo.
1 | E:\Blog>hexo init |
检查: 最后会显示 INFO Start blogging with Hexo!1
2
3
4
5E:\Blog>hexo install
//WARN*2
E:\Blog>hexo g
E:\Blog>npm install hexo-deployer-git --save
//WARN*2
连接Hexo—Github_page.
在根目录下右键,选择Git Bash Here.
如果第一次使用,输入1
2
3
4
5student@XJ507011 MINGW32 /e/Blog
$ git config --global user.name "NAME"
student@XJ507011 MINGW32 /e/Blog
$ git config --global user.email "EMAIL"
否则什么都不干.
接下来输入:1
2
3
4$ ssh-keygen -t rsa -C "EMAIL"
//连续三个回车,默认路径为: C:\Users\Administrator\.ssh
$ eval "$(ssh-agent -s)"
$ ssh-add ~/.ssh/id_rsa
进入Github,点击头像下的Settings,选择SSH and GPS keys,点击New SSH key.Title: 任意, Key: .ssh\id-rsa.pub的内容.
检查:1
2
3
4
5student@XJ507011 MINGW32 ~
$ ssh -T git@github.com
//如果还有要输入的,回答yes.
Hi yanyikai! You've successfully authenticated, but GitHub does not provide shell access.
//只要'Hi'后面是你的NAME,有warning也没关系.
找到根目录下的_config.yml文件,在文本末尾你会找到deploy:,
将其修改成:1
2
3
4
5deploy:
type: git
repository: git@github.com:NAME/NAME.github.io.git
#or repository: https://github.com/NAME/NAME.github.io.git
branch: master
repository最好用前者,否则在hexo d -g时有几率出现bash: /dev/tty: No such device or address错误
最后
1 | E:\Blog>hexo d -g |
将本地文件上传到Github上.
Hexo 指令浅谈
简写对照
n--newp--publishg--generates--serverd--deploy
安装
npm install hexo -g
更新
npm update hexo -g
初始化
hexo init
部署
hexo d -g//上传;
本地编辑
hexo s//于http://localhost:4000/查看;
插入
hexo n post "TITLE" : 添加博客.hexo n page "TITLE" : 添加分栏.